Are you searching for something sophisticated but unique to display your favorite plants in a well-mannered way, whether on the balcony, porch, kitchen or indoors? This amazing list of DIY plant stand ideas always has something to offer.
DIY Plant Stand Ideas

If you want to enhance your indoor garden, building your own do-it-yourself (DIY) plant stand is an excellent idea. You can easily create custom plant stands with creative options matching your style and preferences. This plant will enhance the look of your home and help you display your beloved plants uniquely and attractively so that everyone will admire them.
How To Make Plant Stand?
Here's a simple way to create a DIY plant stand from scratch at home:
The materials you need are:
- Four wooden legs
- One round or square wooden board for the top
- Screws
- Screwdriver
- Sandpaper
- Paint or wood stain
Making:
- Start by gathering all the necessary materials - you'll need four wooden legs (you can decide on the length based on how tall you want your stand to be), a round or square wooden board for the top, some screws, and a screwdriver.
- Decide where to attach your legs on the wooden board, then mark these spots.
- Drill corresponding holes on each wooden leg where you'll insert the screws.
- Attach the legs to the board via the drilled holes and the screws you have. Tighten these screws securely using your screwdriver.
- Once your stand is assembled, you can smooth out any rough edges using sandpaper.
- Lastly, consider painting or staining your new plant stand to the color of your choosing.
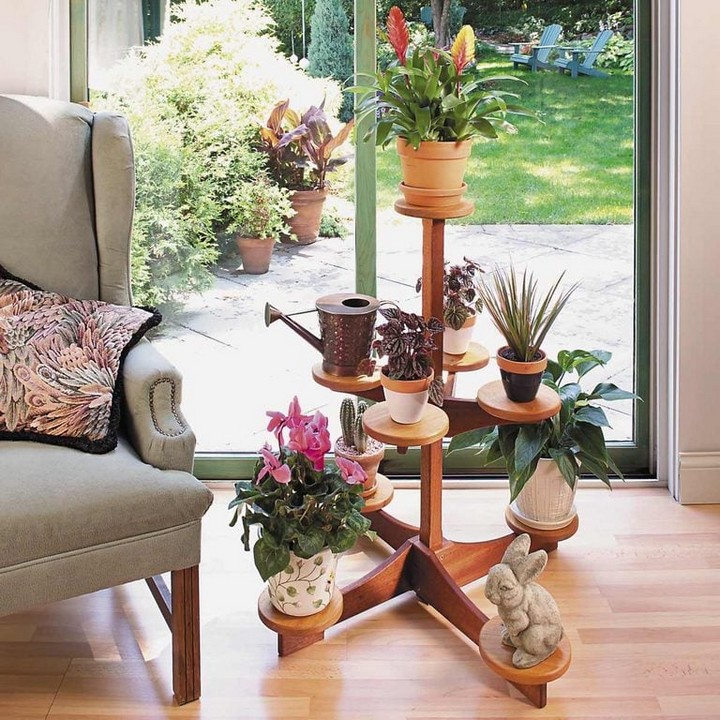
How To Build A Multi-Level Indoor Plant Stand
DIY Carved Hexagon Planter With Plant Stand
This engaging DIY project adds a touch of natural beauty to your home. The Ugly Duckling House's step-by-step tutorial and video walk you through creating a beautiful and functional addition to your living space. With different carving designs to choose from and flexible options for the stand, you can customize the planter to fit your taste and decor.
Starting with assembling small wood pieces into a hexagonal base and sides, you carve your designs before creating an angled stand for stability. Once assembled, protect it with a clear coat to emphasize the grain and carvings, ready to be filled with the greenery of your choice.
Materials:
- 1x6 untreated fence post
- 1x4 cedar board
- Titebond III wood glue
- A rotary tool
- Miter saw
- Drill with drill bits
- 120-grit sandpaper
- Spar urethane clear semi-gloss
- D-ring picture hangers
- Your favorite plant
DIY Outdoor Plant Stand

Want more plants on your deck without placing them on the ground? This DIY guide teaches you how to build a low-cost outdoor plant stand using cedar fence posts and pickets for under $40!
To create this DIY outdoor plant stand, cut the 4x4 cedar post into four equal legs, then cut the cedar pickets into slats for the shelves. Measure and mark the locations for the shelves on the legs and attach using pocket holes and screws. Next, notch out the slats to fit around the legs and secure them with screws. Sand the plant stand using 120-grit and 220-grit sandpaper until smooth. Finally, apply teak oil on the wood to protect against the elements, ensuring your plant stand remains durable and visually appealing outdoors.
Materials:
- One 96" cedar 4x4 post (for the legs of the stand)
- Four 5.5" x ⅝" x 6’ cedar pickets (for the shelves of the stand)
- 2.5" pocket-hole screws (for outdoor use)
- 2" outdoor screws
- 120 grit sandpaper
- 220 grit sandpaper
- Teak oil
- Titebond III Outdoor Glue
DIY Outdoor Plant Stand With Arbor

Are you looking to grow lots of plants in a tight space? Try making a DIY outdoor plant stand! It has two big boxes for planting, pot shelves, and a cool top arbor for hanging some plants.
To make this DIY outdoor plant stand with an arbor, build the side box frames using cedar or pressure-treated 2x2 and 1x4 boards. Next, prepare and attach the fence pickets to these frames as slats, creating a unique design. Add the bottom pieces to the boxes and apply a finish.
Then, prepare and attach the shelves to the structure. Following the shelves, assemble the top arbor and secure it to the top of the plant stand. Finally, apply a coat of marine varnish to preserve the natural color of the wood. This stand can hold pots on the shelves or hanging baskets from the arbor, providing a beautiful and functional addition to your outdoor space.
Materials:
- Cedar or Pressure-Treated 2x2 Boards (for the frames)
- Cedar or Pressure-Treated 1x4 Boards (for the frames)
- 5/4 Cedar Deck Boards (for stability of the structure)
- 1x6 Cedar or Pressure-Treated Fence Pickets (for cladding)
- Wood Screws (for assembly)
- Wood Finish (to protect and enhance the wood)
- Marine Varnish
Easy Indoor Garden Diy Plant Ladder Shelf

Want more plants but low on space? Try the Easy Indoor Garden DIY Plant Ladder Shelf. It's perfect for small houses or flats and easy to build.
You begin by cutting the 1x6 board into four pieces, which will act as the bottoms of each plant shelf. Then, cut 1x3 pieces and attach them around the sides of the 1x6 ones, essentially forming trays. After assembling the trays, cut sides for the ladder and attach them to each tray. For a neat touch, the optional step is to create personalized label tags for your plants using a Cricut Joy Machine.
Once the shelf is assembled and secure, lean it against a wall and add your favorite plants. This elegant but functional ladder shelf adds great aesthetic detail to your indoor space while letting you show off your plants.
Materials:
- One 1x6x8 Board (for the base of the shelves)
- Four 1x3x8 Boards (for the sides of the shelves)
- Miter Saw (for cutting the boards)
- Nail Gun (for joining the boards)
- Drill/Driver (for adding screws)
- 1 ¼″ Brad Nails (for fastening the boards)
- 1 ¼″ Wood Screws (for securing the structure)
- Wood Glue (for additional joining strength)
- Planter Pots
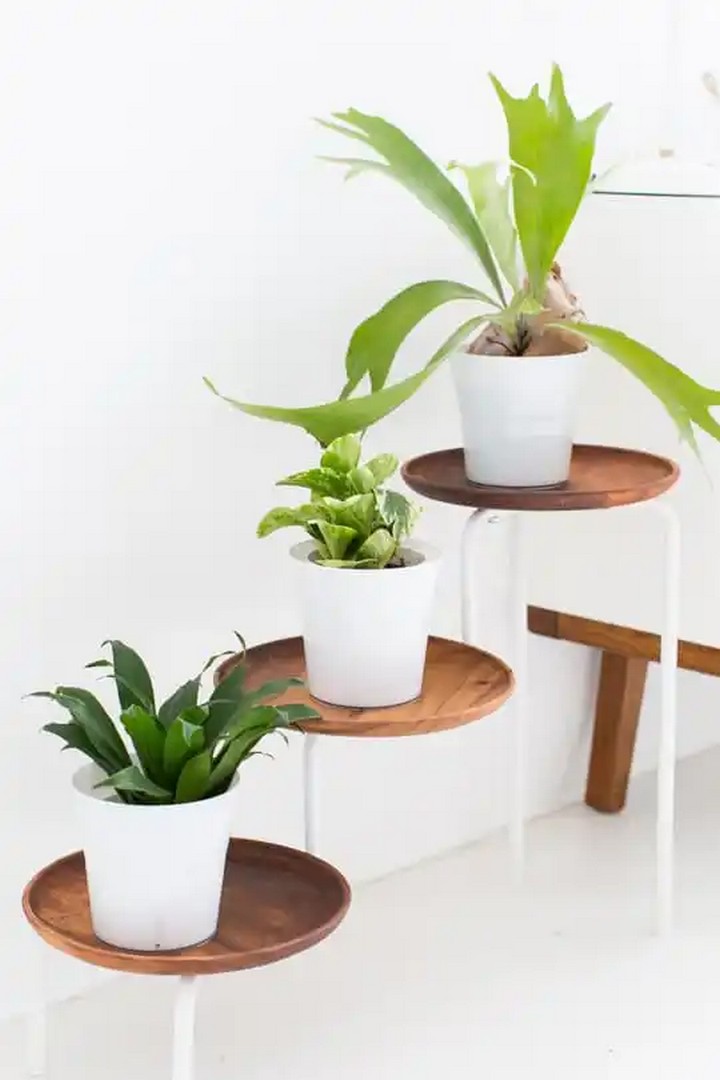
Nesting Plant Stands
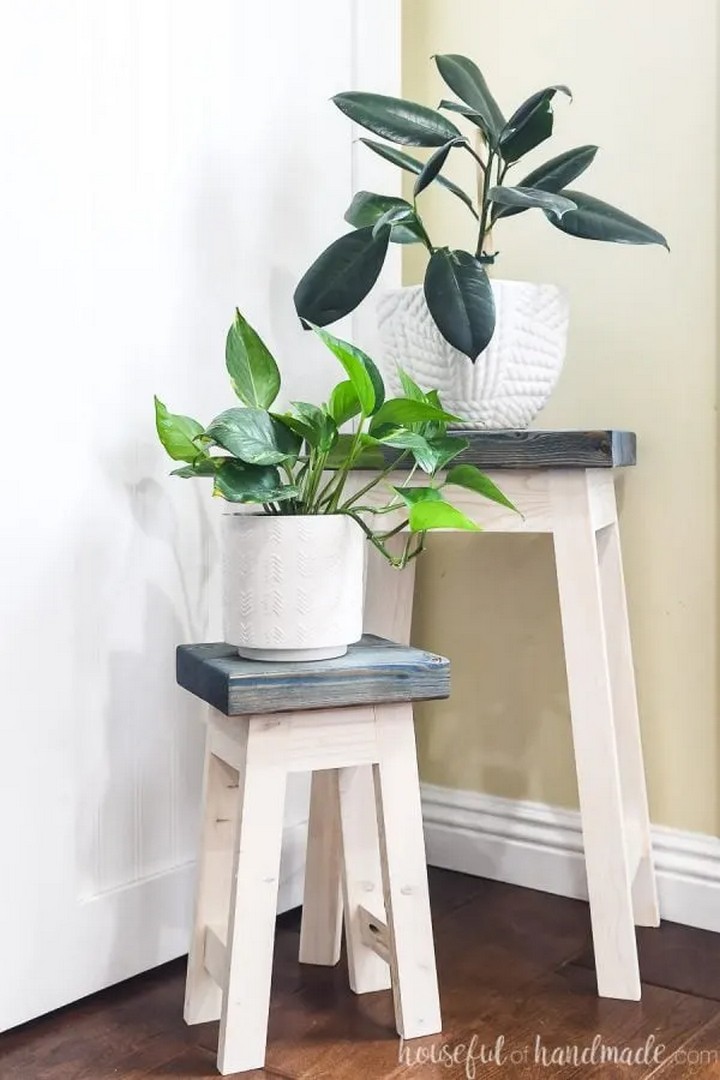
These charming Nesting Plant Stands are not just ordinary furniture but a delightful upgrade for your living space! They put your green companions on a pedestal, creating a captivating scene that's impossible to ignore. And the icing on the cake? These stands aren't just eye candy; they're also an ally for your health, helping to purify the air you breathe in your home.
To make Nesting Plant Stands, prepare the wooden pieces for the base - the legs and their connecting pieces, known as skirts. Connect these parts with some special screws and wood glue. Also, add pieces to support the legs and make them stronger. Next, prepare the top part for each stand using the same method. Measure, cut, and drill the pieces accurately to ensure everything fits together well. Finally, attach the base and the top of each stand, using screws to secure them.
Materials:
- Wood
- Pocket Hole Screws
- Wood Glue
- Sandpaper
- Saw
- Drill
- Screwdriver
- Measuring Tape
- Woodworking Clamps
Slatted Plant Stand
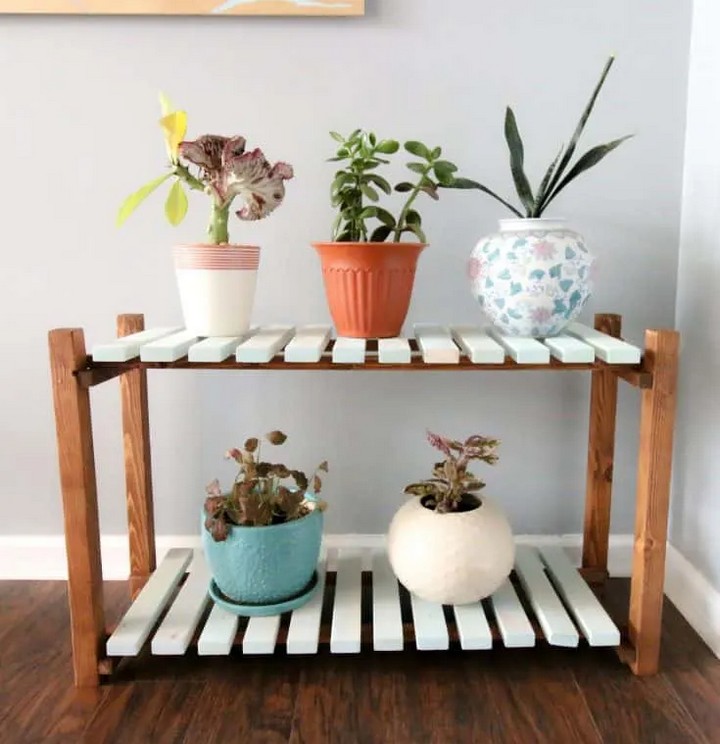
The Slatted Plant Stand is an excellent DIY project for displaying multiple indoor plants in a visually appealing way. This plant stand can be easily built using scrap wood or store-bought pieces.
This gorgeous Slatted Plant Stand is a simple yet rewarding DIY project that stylishly displays your indoor plants. Begin by cutting the wood for the legs, supports, and slats, then stain them in contrasting colors for an appealing look. Assemble the framework by attaching the supports to the legs, forming two sides. Next, connect these two sides using the remaining supports, creating a sturdy stand. Finally, evenly space and secure the slats on both levels, resulting in a charming and functional plant stand to showcase your leafy friends.
Materials:
- 4 feet of 2×4
- 4 square feet of 1×4 for slats
- 3 foot 1×4 for supports
DIY Window Plant Shelf
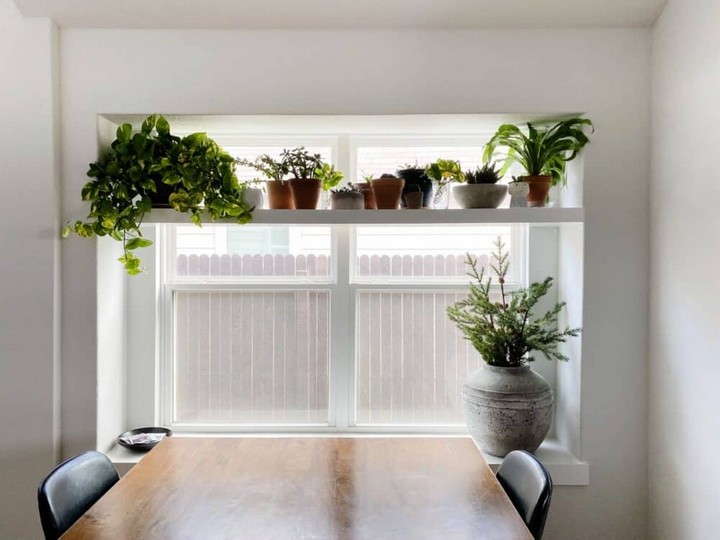
Beautify your home with calm and nature with a DIY Window Plant Shelf. This creative plant shelf will quickly turn your regular window ledge into a green haven for your plants without losing its daily use.
Transform your window into a vibrant display with a DIY Window Plant Shelf. Measure your window's interior dimensions, and construct a frame from 2x2 pine boards. Using construction adhesive and screws, assemble the frame, adding cross pieces every 16 inches. Install the frame alongside your window, mindful of your plants' height requirements.
Fit a 1x12 board over the top of the frame and secure it with construction adhesive and nails. Repeat this with ¼" plywood for the bottom and a 1x4 board for the front. Fill seams and nail holes with wood filler, allow it to dry, and sand it down. Caulk the shelf against the walls for a finished look, and choose a paint that matches your home's trim. Voilà!
Materials:
- 2x2 pine boards
- 1 sheet of ¼″ plywood
- 1x12 pine board
- Construction Adhesive
- Wood Filler
- 1x4 pine board
- Caulk
- Paint
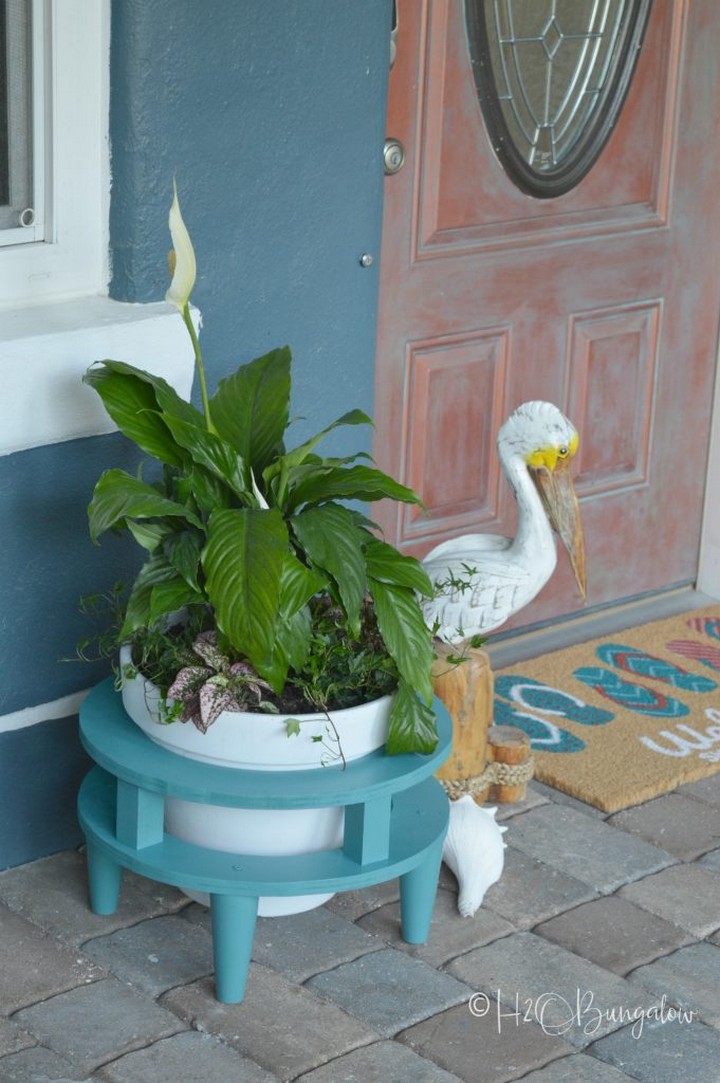
DIY Plant Stands
Add a touch of greenery to your patio with a DIY Plant Stand, and surely you'll also like it. These stands give height and a sense of depth to your flowering arrangements and allow flexibility for pot size.
Make DIY Plant Stands by trimming a spare piece of 2x2 wood into a 9 ¾" piece and two 4 ⅛" pieces. Line them up on one side and join them with wood screws and glue. Use four 1x2 or 2x2 wood parts for the stand's feet, based on how heavy and tall your stand needs to be. Connect the feet to the shelf using holes you've drilled earlier, wood glue, and weather-proof deck screws. If you like, cover the screws with wood filler and smooth the stand for a neater look. Paint it and add a few layers of durable outdoor varnish or poly to finish.
Materials:
- Scrap 2x2 wood
- 1x2 or 2x2 wood for legs
- Wood glue
- 1 ½" deck screws (non-rusting)
- Wood filler
- Paint (of your preference)
- Outdoor appropriate varnish or polyurethane
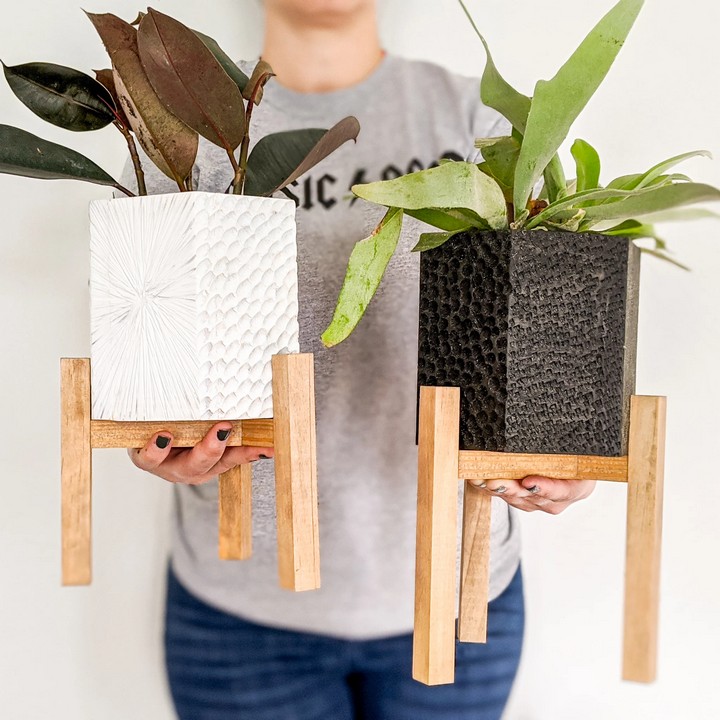
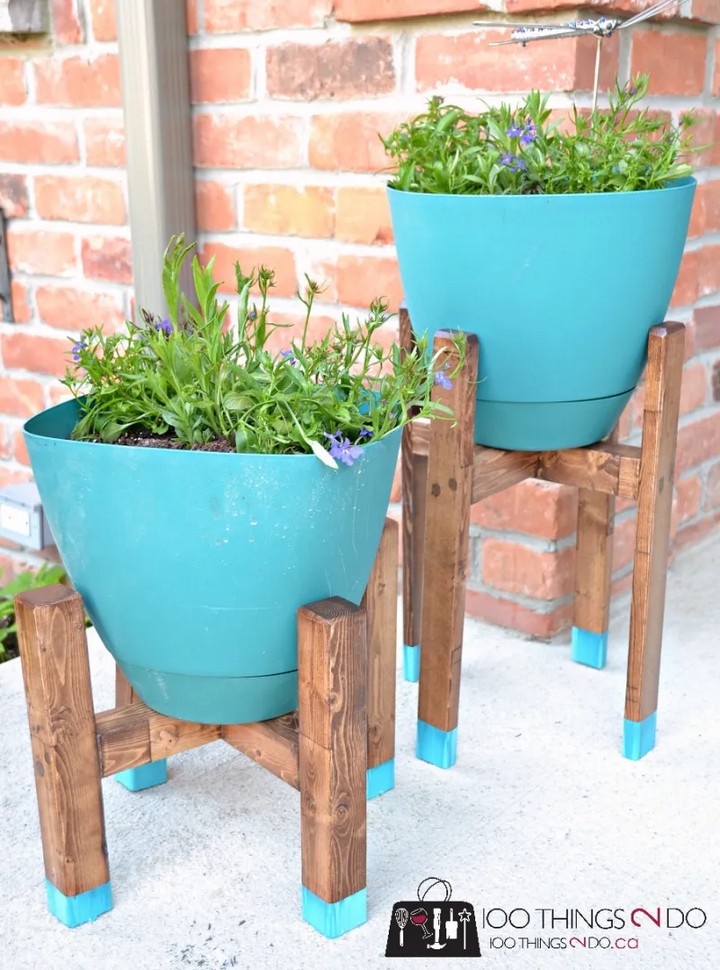
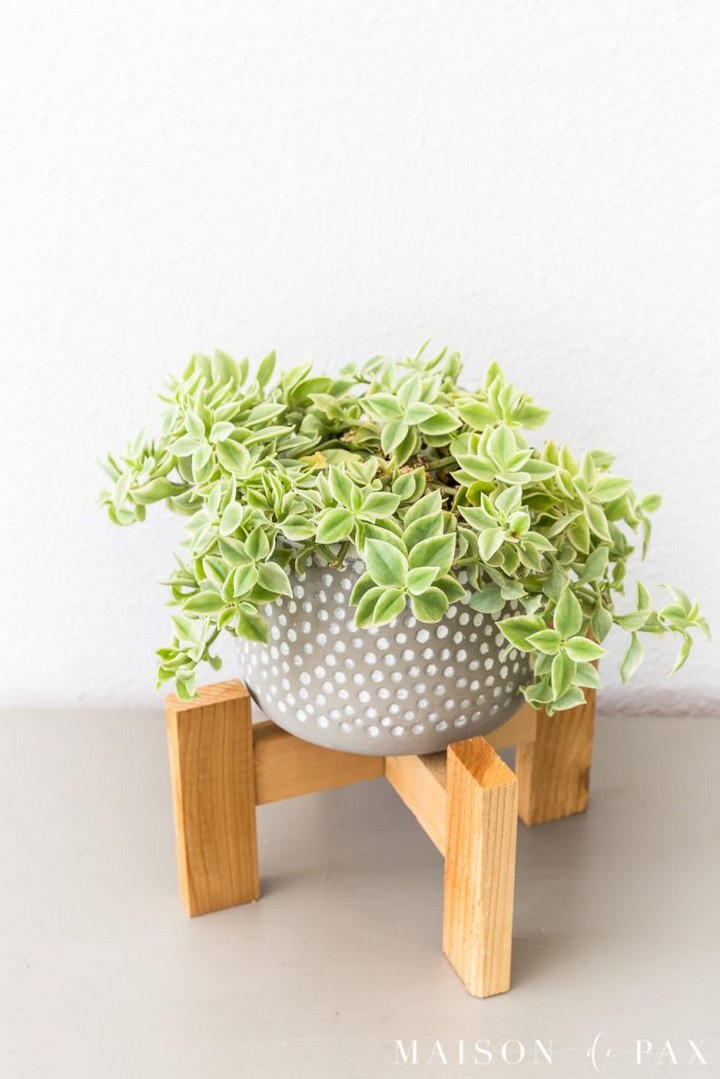
DIY Mid-Century Modern Plant Stand
This DIY Mid-Century Modern Plant Stand is stylish and adaptable and adds a vibrant, charming touch that brings an elegant blend of nature and design into any living space.
To create a DIY Mid-Century Modern Plant Stand, first cut two 18" square pieces of ¾" plywood and four 6" tapered legs from a 2' x 4' sheet of birch plywood. Then, prepare four 4" x 2"x 2" blocks from a 2" x 2" x 24" piece of wood and a large terra cotta planter. Attach the legs to the plywood squares using 3 ½" screws, applying Gorilla non-foaming wood glue for reinforcement. Pre-drill holes before screwing them into the legs for secure attachment. Paint them using Rustoleum Spray Paint in Vintage Teal to give a vibrant touch.
Materials:
- 2- 18″ square ¾″ plywood
- 4 – 6″ tapered legs these are the ones I used
- 3 ½″ screws
- 4 – 4″ x 2″x 2″ blocks
- large terra cotta planter
- Rustoleum Spray Paint in Vintage Teal
- Gorilla non-foaming wood glue
How To Make A Plant Stand

Create a plant stand with an extra shelf using an old drawer and wood from a pallet. This easy-to-do woodwork task needs very few tools.
Measure the drawer and cut your pallet wood accordingly. Prepare your frame by creating pocket holes in the support and shelf strips, then using wood glue and screws, attach the support strips to the frame. Securely attach the drawer to the plant stand frame, ensuring sufficient space. Attach the pallet shelves with clamps or a straight edge. For proper drainage, drill holes in the bottom of the drawer.
Materials:
- An old drawer
- Pallet wood
- Pocket hole screws
- Wood glue
- Liner for your planter
How To Make An Indoor DIY Acacia Wood Plant Stand
This creative project will guide you through building an elegant acacia wood plant stand. This approach involves upcycling an Ikea PS plant stand that transforms a simple item into a chic home for indoor plants.
Beginning with an assembled Ikea PS plant stand, you can elevate its design by attaching acacia wood plates. Start by cutting holes in the wood plates, fitting the size of your plant pots. You can then fasten these plates onto the stand using flat socket cap screws and connecting cap nuts. Secure the wood plates and brass cap nuts using E6000 glue while holding them in place with clamps until the glue firms up. Sand the edges of the holes and each wood piece's outer perimeter to avoid splinters.
Materials:
- Ikea PS plant stand
- Acacia wood plates
- Super glue or E6000 glue
- Flat socket cap screws
- Connecting cap nuts
- Clamps
DIY Plant Stand
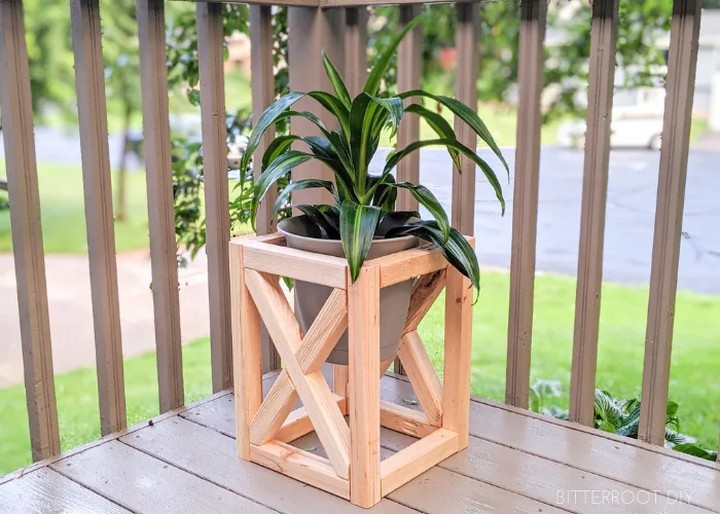
Creating your own DIY plant stand is a straightforward process guided in detail in this tutorial. First, cut your chosen lumber to the required lengths and prepare them for assembly by drilling pocket holes at the ends of each piece. Use these holes to securely join your stand’s outer frames with wood glue and screws. Once the frames are assembled, measure, cut, and attach the X supports to each frame using nails and glue. Connect your two frames using horizontal supports placed at the base of the stand. Once assembled, fill any remaining pocket holes with wood filler or plugs and allow it to dry.
Materials:
3 pieces of 2 x 2 @ 8′ lumber
Miter Saw, Drill, Brad Nailer, Kreg Pocket Hole Jig, Orbital Sander
Tape Measure, Level, Speed Square, Pencil
Safety Glasses, Ear Protection,
Clamps, Exterior Wood Glue
Exterior Spar Urethane
2 ½” Screws
2" Finish Nails
1 ¼" Finish Nails
Tall Corner Plant Stand
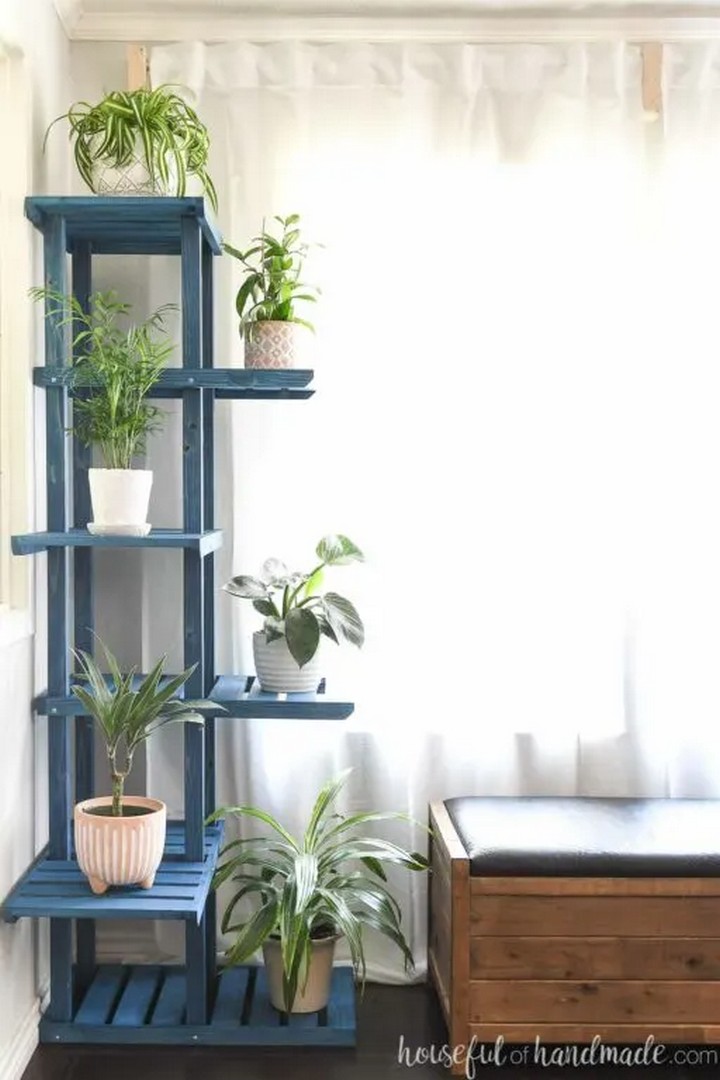
Creating a Tall Corner Plant Stand allows you to display many plants neatly and space-savingly. First, cut your shelf sides and slats and optionally create grooves. Then, use wood glue and nails to assemble the shelves while keeping the right space for the plants. Sand the shelves and apply your finish of choice. Next, prepare the legs and attach them to the bottom shelf using pan head screws. Continue attaching the shelves to the legs, ensuring each shelf alternates in direction. Finish the construction by placing and securing the top shelf. You should secure the whole stand to the wall for increased stability.
Materials
- 1 x 4 boards (for the side pieces of the shelves)
- 1 x 2 boards (for the slats of the shelves)
- 2 x 2 boards (for legs)
- Wood Glue
- 1 ¼″ finish nails
- 2″ self-tapping screws
- 120-grit sandpaper & 220-grit sandpaper
- Exterior grade finish (optional for outdoor use)
- Paint or Stain of your choice.
Vertical DIY Plant Stand
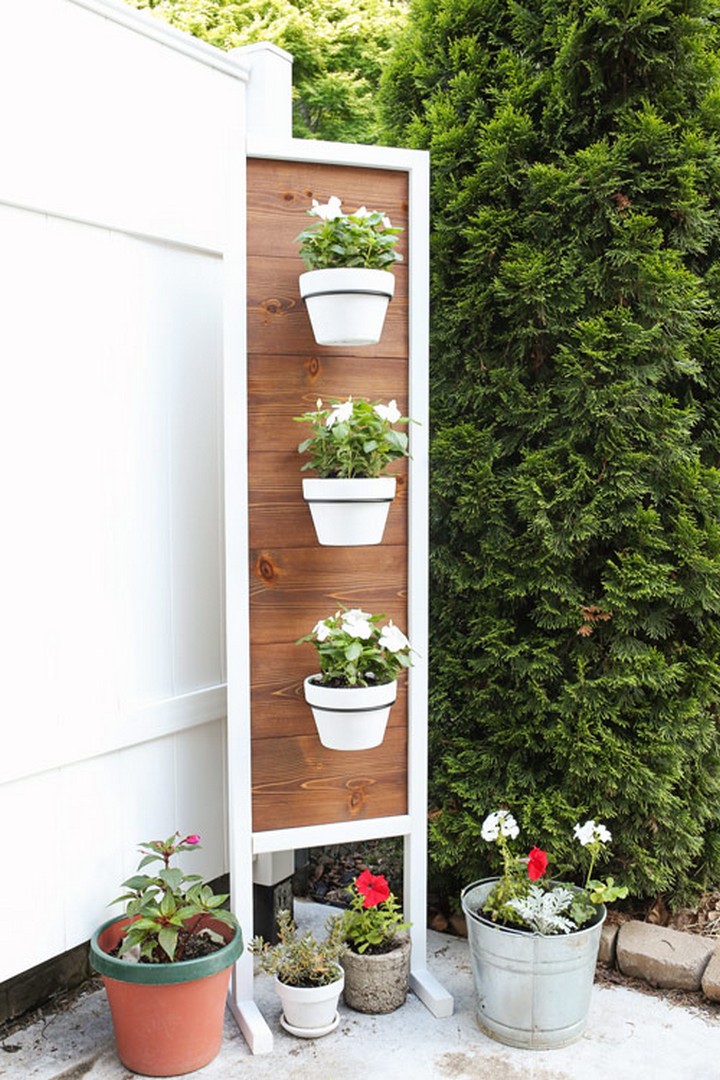
This Vertical DIY Plant Stand effectively adds more plants to your space beautifully and efficiently.
Cut 2x2s and 1x8 boards with a miter saw using the given measurements. Add pocket holes to cut boards using a Kreg Jig. Stain 1x8 boards and paint 2x2s as desired. Assemble the structure, attaching 65" pieces to a 13" piece from the top, and then attach stained 1x8 boards to the frame. Add 12" pieces to the planter base and a 13" piece under the last 1x8 board. Finally, attach planter hooks to the stand, arrange flower pots, and enjoy the pretty display!
Materials:
- 2x2 boards (for the frame)
- 1x8 boards (for the planter shelves)
- Kreg Jig (for adding pocket holes)
- Miter Saw (for cutting boards)
- Stain (for 1x8 boards)
- Paint (for 2x2 boards)
- Wall planter hooks (for hanging the pots)
- Screws (for assembly)
Skinny Planter Stand DIY
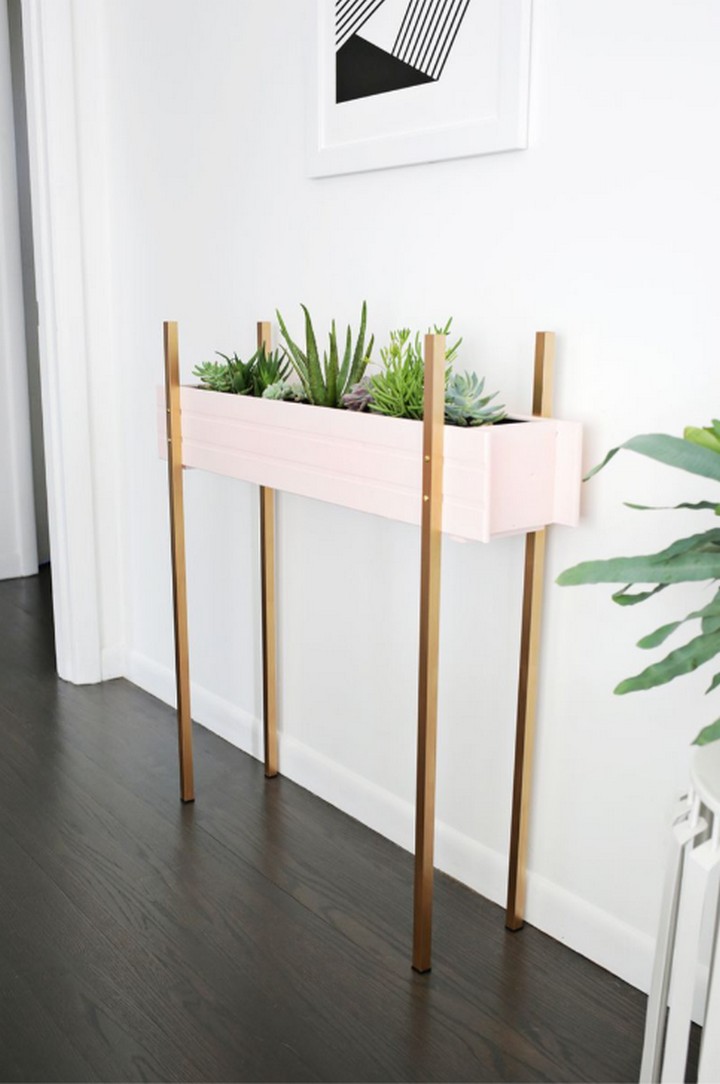
The Skinny Planter Stand is a gorgeous DIY project that elevates your plant display with a dash of modern elegance. It not only enhances your decor but also perfectly showcases your green thumb.
Decide on the desired height for your stand and attach the 36" square aluminum tubes to the window box using clamps. Drill two holes through the tubes into the box. Remove tubes, paint them gold, and add non-skid pads beneath them. Paint the window box in your chosen color, like Baby Blush by Valspar, then reconnect the tubes to the box with screws and nuts. Finish it by adding plants to your box insert.
Materials:
- 36" Square Aluminum Tubes (for the legs)
- Window Box
- Clamps
- Drill
- Gold Paint (for the aluminum tubes)
- Non-skid Felt Pads
- Paint (for window box, suggested color: Baby Blush by Valspar)
- Machine Screws and Nuts
- Window Box Insert
DIY Cedar Wood Plant Stand
The DIY Cedar Wood Plant Stand is crafted by creating robust joints between cedar 1x2s, supporting your pot and plant.
Begin by identifying your desired measurements and making the necessary cuts to the cedar, shaping them into a stand. Assembling the pieces to form a stand that fits any pot, you can customize the structure to your liking. This functional stand can boost the appeal of your plants and be used indoors and outdoors, complementing your home's decor in a sophisticated way. Check the original tutorial for detailed instructions.
Materials:
- Cedar 1x2s
- Miter Saw
- Wood Glue
- 1 ¼" Pocket Hole Screws
- Kreg Jig (for creating pocket holes)
- Orbital Sander or Sandpaper
- Finishing Supplies
DIY Outdoor Plant Stand Multiple Plants
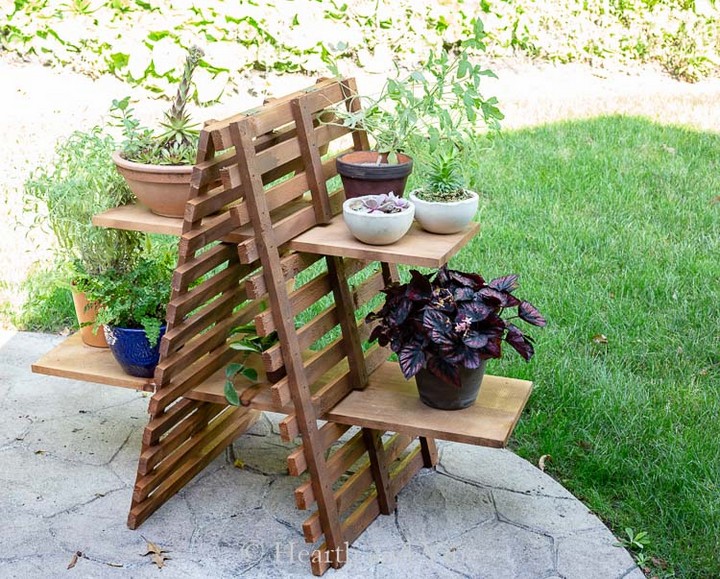
This DIY Outdoor Plant Stand for Multiple Plants is an ideal project if you're looking to create a stylish and practical display for your plants.
Get all the materials you need to make this outdoor plant stand for multiple plants. Cut the cedar lattice into two parts and connect them with hinges. Then, prepare the pine boards, which will serve as shelves. Create spaces in the lattice for the shelves and attach the shelves in place. For a smooth finish, sand the whole stand, and finally, add a coat of paint or stain for a neat look and to protect the wood. Your plant stand is now ready for you to arrange for a fabulous outdoor display.
Materials:
-
Jig Saw
-
Cedar lattice - 6 ft
-
Hinges
-
Pine Boards
DIY Copper Round Plant Stand
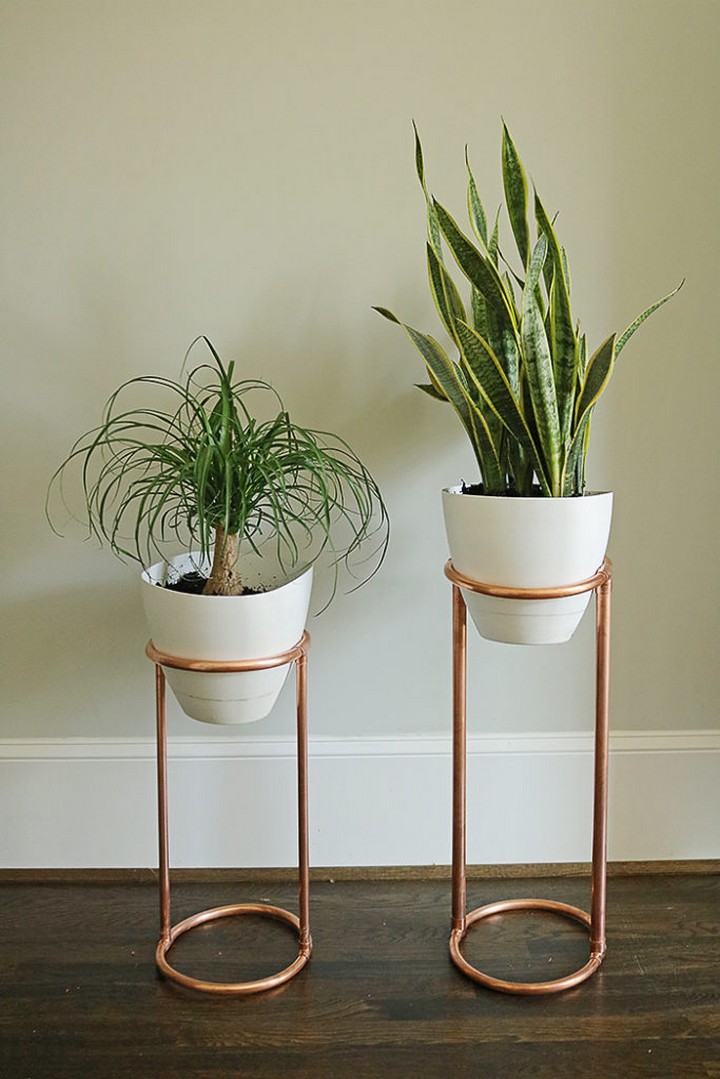
To create the DIY Copper Round Plant Stand, gather all your materials. Then, measure and cut the copper coil and pipes according to the desired height of the stand. Assemble the stand by connecting the copper pipes with copper tees and attaching the coil around the stand. Secure the joints using E6000 glue. After giving it enough time to dry, place your plant pot on the stand, ensuring it fits properly. Your stylish copper round plant stand is ready to showcase your favorite plant.
Materials:
- Copper Pipes
- Copper Coil
- Copper Cutter
- Copper Tee (4 pieces)
- E6000 Glue
- Black Sharpie Marker
- Tape Measure
- Plant Pot
Modern A Frame Plant Stand
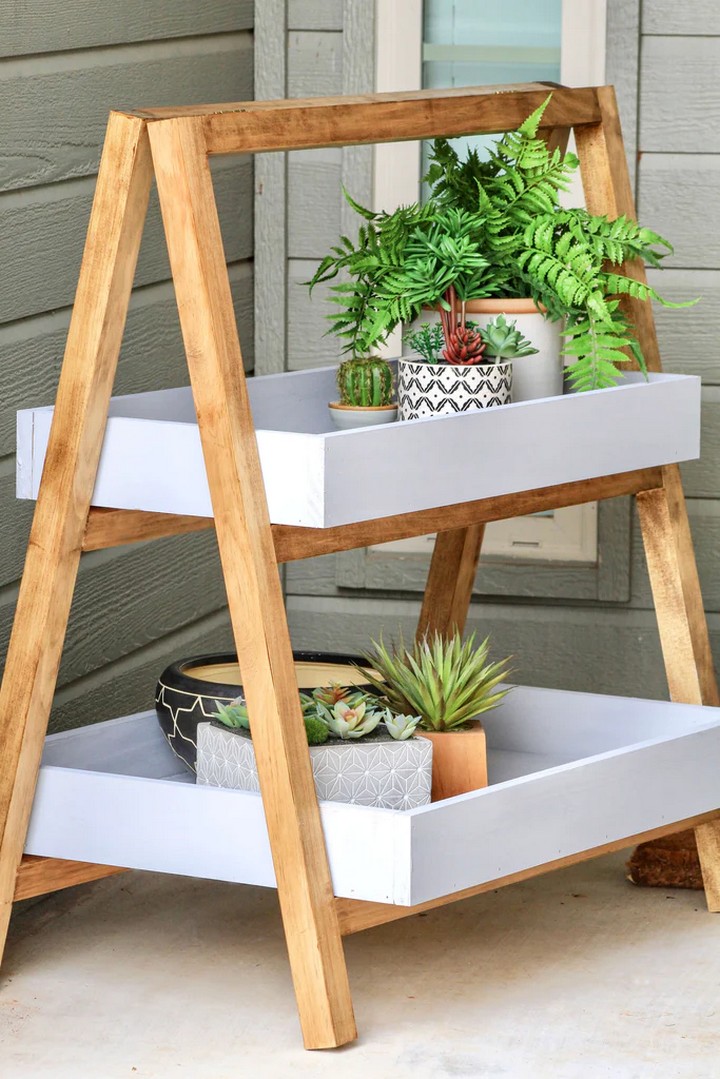
The Modern A-Frame Plant Stand makes a stunning statement in any space with its sleek design, making it not just a plant stand but also a decor that embraces modern aesthetics while nicely showcasing your greenery.
Building a Modern A-Frame Plant Stand involves several steps that require specific tools and materials. Starting with two 1x2 8ft boards and one 1x3 8ft board, first cut the boards to the required dimensions to create the legs and shelves of the stand. Once cut, assemble two ladder structures by drilling pocket holes in the legs and shelves, then securing them together using 1" pocket hole screws. These two ladders will form the 'A' frame. Then, join these two ladders together by attaching a top shelf using wood glue and 1" pocket hole screws.
Materials:
- Two 1x2 8ft boards
- One 1x3 8ft board
- 1" pocket hole screws
- Wood glue
- Sandpaper (100, 150, 220 grits)
- A wood stain of your choice
- Top coat for protection (optional)
- Rubber-padded,
You can also see:
DIY Umbrella Stand Ideas: Umbrella holders are really helpful in keeping your house's entrance clean and clutter-free. With more people getting into do-it-yourself projects, it's now pretty easy to make your own umbrella holder that fits your style and decoration.